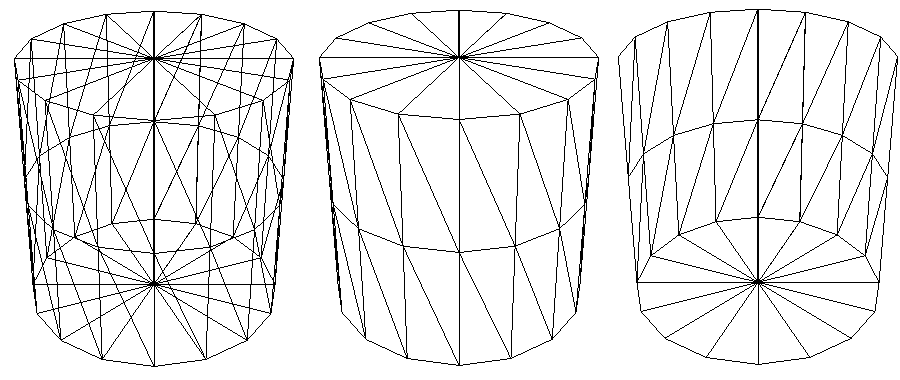
Left shows default rendering of polygon edges, middle calls glEnable(GL_CULL_FACE);, right images calls glCullFace(GL_FRONT) and glEnable(GL_CULL_FACE);
March 13, 2013 2010
OpenGL face culling calculates the signed area of the filled primitive in window coordinate space. The signed area is positive when the window coordinates are in a counter-clockwise order and negative when clockwise. An app can use glFrontFace() to specify the ordering, counter-clockwise or clockwise, to be interpreted as a front-facing or back-facing primitive. An application can specify culling either front or back faces by calling glCullFace(). Finally, face culling must be enabled with a call to glEnable(GL_CULL_FACE);.
The color buffers are the ones to which you usually draw. They contain RGB color data and may also contain alpha values. Double-buffered systems have front and back buffers, and a single-buffered system has the front buffers only.
The depth buffer stores a depth value for each pixel. Depth is usually measured in terms of distance to the eye, so pixels with larger depth-buffer values are overwritten by pixels with smaller values. This is just a useful convention, however, and the depth buffer's behavior can be modified as described in "Depth Test." The depth buffer is sometimes called the z buffer (the z comes from the fact that x and y values measure horizontal and vertical displacement on the screen, and the z value measures distance perpendicular to the screen).
On older harware, clearing the screen (or any of the buffers) is typically one of the most expensive operations you can perform - on a 1280 x 1024 monitor, it requires touching well over a million pixels. For simple graphics applications, the clear operation can take more time than the rest of the drawing.>
To address this problem, some machines have hardware that can clear more than one buffer at once. The OpenGL clearing commands are structured to take advantage of architectures like this. First, you specify the values to be written into each buffer to be cleared. Then you issue a single command to perform the clear operation, passing in a list of all the buffers to be cleared. If the hardware is capable of simultaneous clears, they all occur at once; otherwise, each buffer is cleared sequentially.
The following commands set the clearing values for each buffer.
After you've selected your clearing values and you're ready to clear the buffers, use glClear().
When you draw geometry, text, or images on the screen, OpenGL performs several calculations to rotate, translate, scale, determine the lighting, project the object(s) into perspective, figure out which pixels in the window are affected, and determine what colors those pixels should be drawn. After OpenGL determines that an individual fragment should be generated and what its color should be, several processing stages remain that control how and whether the fragment is drawn as a pixel into the framebuffer. For example, if it's outside a rectangular region or if it's farther from the viewpoint than the pixel that's already in the framebuffer, it isn't drawn. In another stage, the fragment's color is blended with the color of the pixel already in the framebuffer.
The tests and operations occur in the following order; if a fragment is eliminated in an early test, none of the later tests or operations take place.
Scissor test
Alpha test
Stencil test
Depth test
Blending
Dithering
Logical operation
In RGBA mode, the alpha test allows you to accept or reject a fragment based on its alpha value. The alpha test is enabled and disabled by passing GL_ALPHA_TEST to glEnable() andglDisable(). To determine whether the alpha test is enabled, use GL_ALPHA_TEST with glIsEnabled().
If enabled, the test compares the incoming alpha value with a reference value. The fragment is accepted or rejected depending on the result of the comparison. Both the reference value and the comparison function are set with glAlphaFunc(). By default, the reference value is zero, the comparison function is GL_ALWAYS, and the alpha test is disabled. To obtain the alpha comparison function or reference value, use GL_ALPHA_TEST_FUNC or GL_ALPHA_TEST_REF with glGetIntegerv().
One application for the alpha test is to implement a transparency algorithm. Render your entire scene twice, the first time accepting only fragments with alpha values of one, and the second time accepting fragments with alpha values that aren't equal to one. Turn the depth buffer on during both passes, but disable depth buffer writing during the second pass
Another use might be to make decals with texture maps where you can see through certain parts of the decals. Set the alphas in the decals to 0.0 where you want to see through, set them to 1.0 otherwise, set the reference value to 0.5 (or anything between 0.0 and 1.0), and set the comparison function to GL_GREATER. The decal has see-through parts, and the values in the depth buffer aren't affected. This technique, called billboarding.
For each pixel on the screen, the depth buffer keeps track of the distance between the viewpoint and the object occupying that pixel. Then if the specified depth test passes, the incoming depth value replaces the one already in the depth buffer.
If enabled, do depth comparisons and update the depth buffer. Note that even if the depth buffer exists and the depth mask is non-zero, the depth buffer is not updated if the depth test is disabled.
glDepthMask specifies whether the depth buffer is enabled for writing. If flag is GL_FALSE, depth buffer writing is disabled. Otherwise, it is enabled. Initially, depth buffer writing is enabled.
You can also choose a different comparison function for the depth test with glDepthFunc().
© Ken Power 1996-2016